We all like options. Knowing that, CA allows you to offer your clients multiple ways to pay for a coaching package. In this article, you will learn how to set up two different payment options for the same coaching program.
An Overview
- First, we will start by creating two different Engagement Templates. One will have a single invoice with a 10% discount, and the other will break the payment up into monthly installments.
- Next, we will create two different Offerings.
- Lastly, we will create an Offering Collection, which will serve as the menu of options for those two payment plans.
1. Creating the Engagement Templates
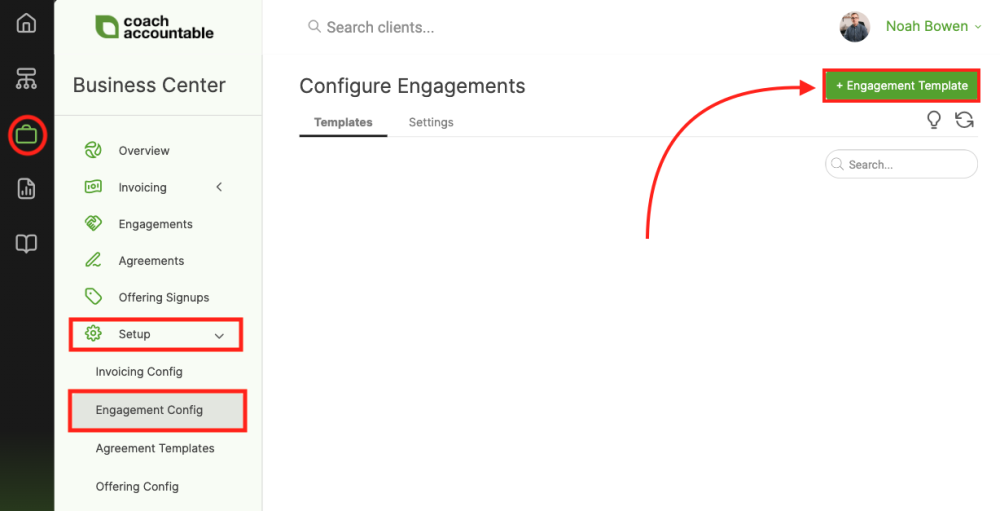
Start by navigating to Business Center >> Setup >> Engagement Config, and then click the +Engagement Template button.
Creating the Annual Prepay Engagement
The Basics Tab
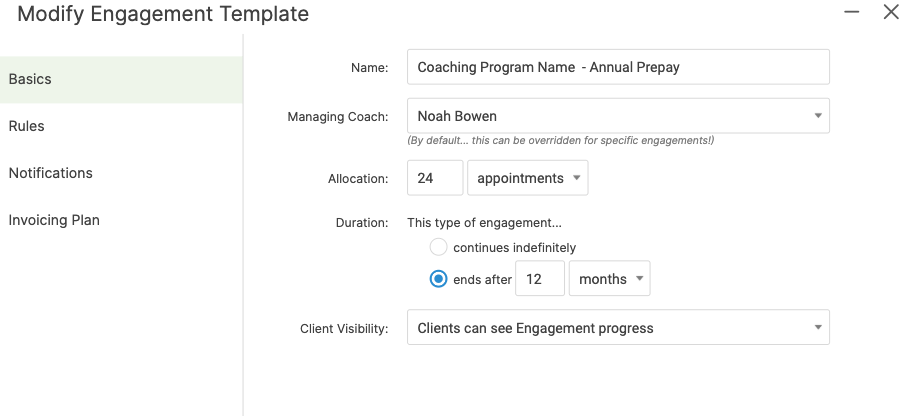
First, give your Engagement Template a simple, descriptive name that distinguishes it as the annual option for this coaching program. Keep in mind that the client may see this name. Something like "Coaching Program Name - Annual Prepay" will do. (Note: please fill in "Coaching Program Name" with the name of your coaching program.)
Next, you will want to set the Allocation to the number of appointments or hours this program provides. For our example, we are going to assume that this program allows for 24 appointments to be used throughout the year.
Lastly, set the Client Visibility as you see necessary. Here is a quick summary of the three options:
- Totally hidden from clients: Clients DO NOT know how many sessions they have had or invoices they have paid.
- Clients can see Engagement progress: Clients DO know how many sessions they have had, but they DO NOT know how many invoices they have paid.
- Clients can see Engagement progress plus invoicing : Clients DO know how many sessions they have had, and they DO know how many invoices they have paid.
The Invoicing Plan Tab
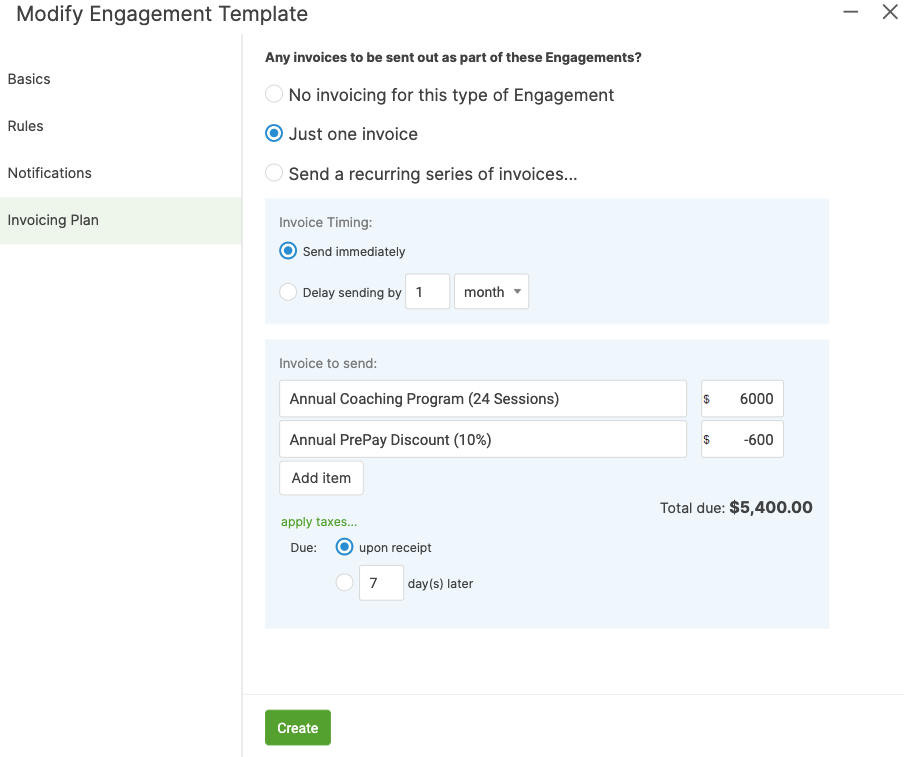
Since this is a one-time payment, select the "Just one invoice" option. Then, you will want to customize the invoice to match the details of the annual prepay option. In our example, we are offering a 10% discount for choosing to pay up front.
Adjust as you need to, and then be sure to click the Create button at the bottom.
The Rules Tab and Notifications Tab
For now, skip over these two tabs. Make a note to learn more about Engagement Rules and Notifications here: Engagement Templates
Creating the Monthly Payment Engagement
The Basics Tab
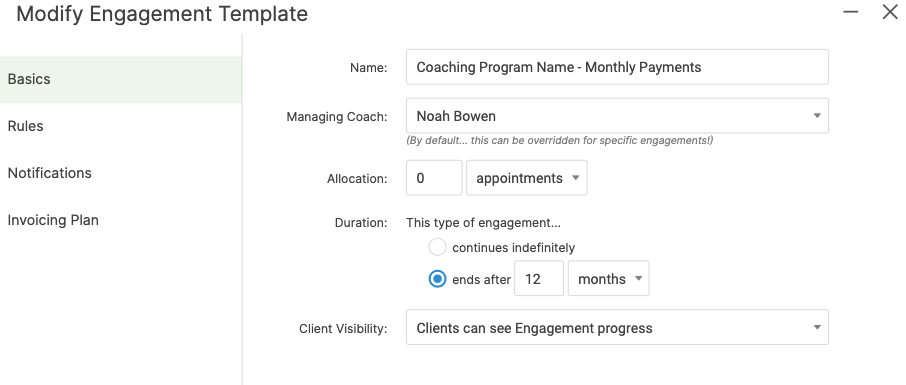
Again, give your Engagement Template a similar name to the Annual Prepay Engagement Template. Something like "Coaching Program Name - Monthly Payments" will do.
For the Annual Prepay Engagement, we set the Allocation to 24 Appointments since the full year is already paid for. For the monthly payment option, we are going to rely on the Invoicing Plan to add Allocation, so set the Allocation to 0 Appointments. Doing so will ensure that clients don't receive more Appointments than they have previously paid for.
Lastly, set the Client Visibility the same way you did for the Annual Prepay Engagement.
The Invoicing Plan Tab
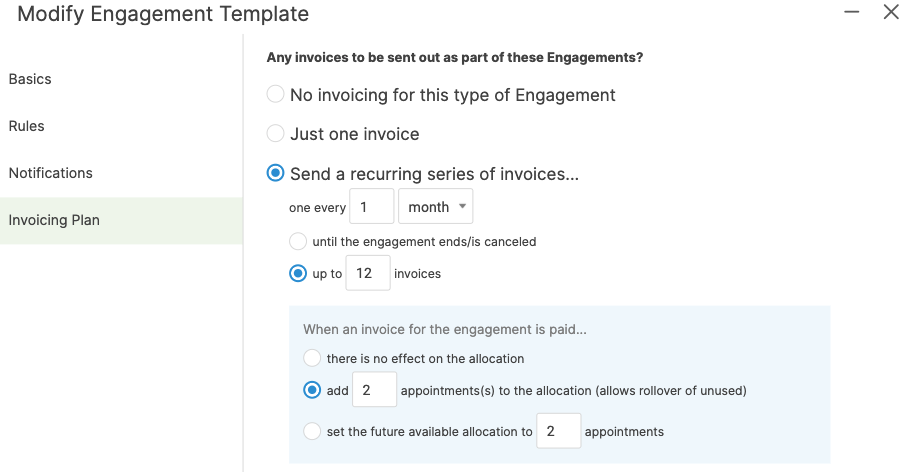
Select the "Send a recurring series of invoices..." option. Then, change the number of invoices to 12.
Since the Engagement doesn't start with allocation, you need to adjust what happens when an invoice for the Engagement is paid. Select the middle option to "add 2 appointments to the allocation."
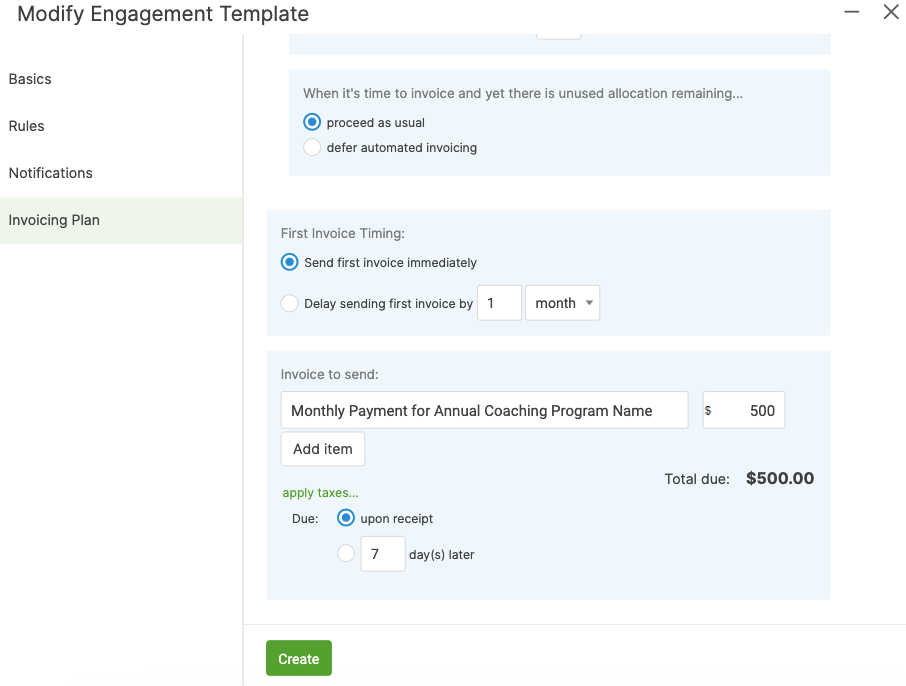
Adjust the Engagement's Invoice to clearly indicate that this is a monthly payment for your annual coaching program name. Something like "Monthly Payment for Coaching Program Name" will do.
Finish by clicking the Create button.
The Rules Tab and Notifications Tab
Remember to set the rules and notifications as you did for the Annual Prepay Engagement.
Note: if you set any Allocation-Based Notifications, they will need to be adjusted for this Engagement Template. For the Annual Prepay Engagement, the client started with 24 Appointments, but this Engagement is set to only receive 2 Appointments per month, so an Allocation-Based notification is not as useful in this situation.
2. Creating the Offerings
Now that you have the two Engagement Templates, you need to create two Offerings so that your clients can sign up for these Engagements.
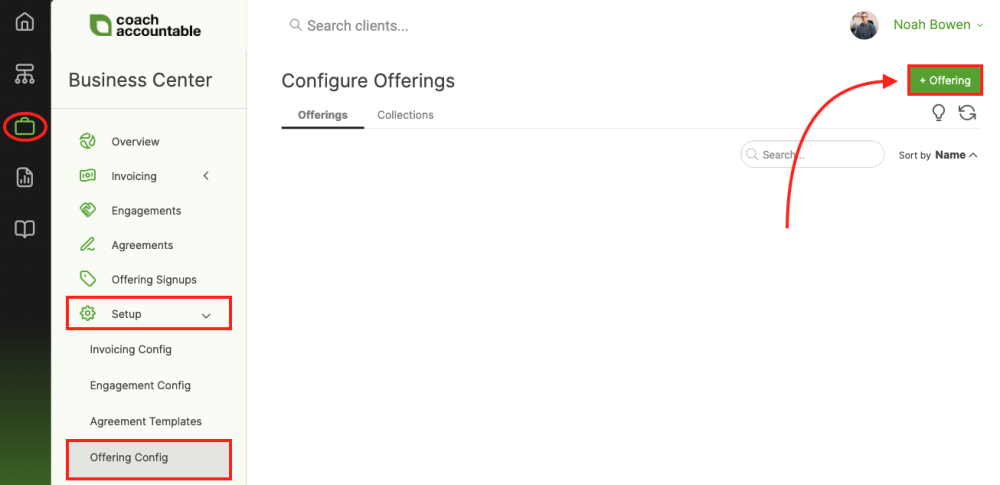
Navigate to Business Center >> Setup >> Offering Config, and then click the +Offering Template button.
The Basics Tab
Start by naming both Offerings. You will want to name them very similar to the Engagements Templates. Your clients will see the two names, so make it clear what they are signing up for.
The Descriptions Tab
Since your Offerings will be part of an Offering Collection, you need to set a Blurb and Description for each of the Offerings.
The Blurb is a short sentence that quickly allows for clients to distinguish between the two Offerings. For our example, we will set the following blurbs:
- "Save 10% by paying for the program today."
- "Or spread your payments out monthly."
The Description Field is a place where you can share all of the details that this offer entails. For example, here is what you could list in this field:
Coaching Program Name
This program includes:
- Twelve months of coaching (24 50-minute sessions)
- Full use of the CoachAccountable Coaching Portal
- Session notes of each session
- Recordings of each session
- Weekly/Daily accountability (based on your needs)
Finishing the Offerings
In this example, the same Appointment and Worksheet are part of both Offerings.
Next, set each Offering's specific Engagement and Agreement. (Note: Depending on how you have created your Agreement Templates, you may or may not need Offering Specific Agreements.)
Lastly, review the On-Screen Welcome and Confirmation Email tabs. You may or may not want to adjust the language to match your voice or the specifics of this coaching program.
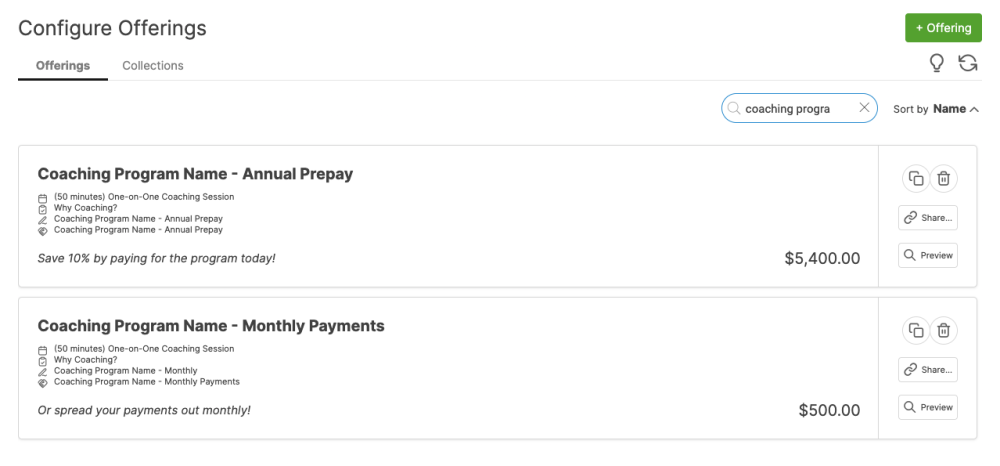
Based on this example, you now have two completed Offerings. They both have the same Appointment Type and Worksheet, but separate Engagements and Agreements. If you navigate to the Offering Config page and search for the name of your coaching program, you should see something similar to the screenshot below.
3. Adding the Offerings to the Collection
Now, click on the Collections tab, and create a new Collection to house these two Offerings. You can then add the Offerings by scrolling through the available Offerings or using the search bar at the top. Finish by clicking the Save button.
Previewing the Collection and Sharing it With Clients
Before you share this Offering Collection with your clients, be sure to click the Preview button. Now, you will be able to see if the Offering Blurbs and Descriptions meet your needs. If not, go back to each Offering and edit them there.
You can copy the URL or embed this Offering on your website by clicking on the Share button.